LIFE AT THE COTTAGE

Showing posts with label Holiday Celebrations. Show all posts

Friday, March 16, 2012

Dyeing and Decorating Eggs the Natural Way


Prior to this pretty project, it had been many years since I had dyed eggs.

And, sadly, the last time involved nothing more than plopping little tablets in cups of water
and vinegar, waiting for the tablets to dissolve, and merely dipping
plain eggs into the pastel solutions.


But...
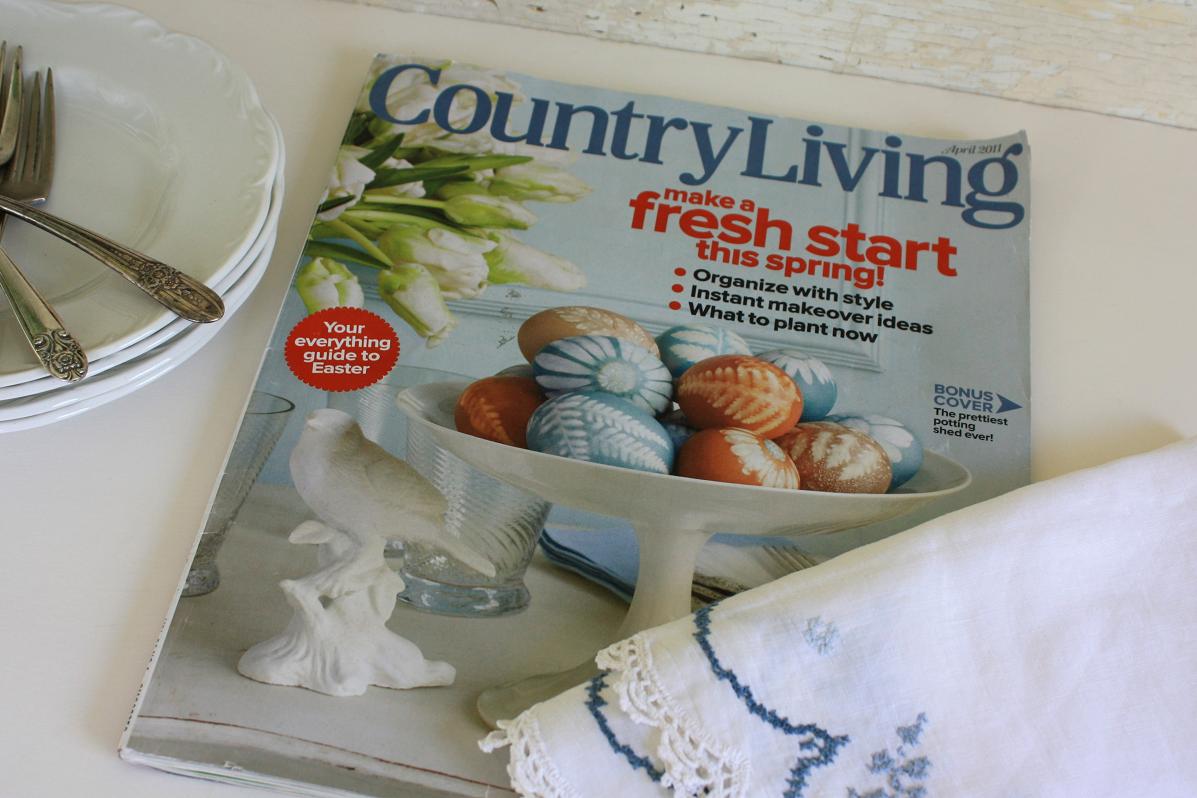
receiving this issue of Country Living, spring of last year,
 forever changed the way I perceive egg dyeing.

Being even more health conscious now, than I was years ago,
made the thought of using natural materials for dyes quite appealing.
And the artistic aspect of this project was an added plus.

If you would like to know how I achieved the results that you see above,
follow along, and I'll walk you through the process.


The first thing you'll want to do is to
collect the tools necessary to accomplish the task.

Tools:
A cutting board and sharp knife for chopping food and plant materials
Pots large enough to accommodate water and the dye materials
Lids for the pots—to prevent excessive evaporation
A measuring cup
A strainer
A slotted spoon
Coffee filters
Small bowl and small pastry brush (optional)


You will also need:
Scissors
Knee highs or panty hose, cut into 3-4" sections
Twist ties


Since I wanted my eggs to be as close to the colors on the magazine cover as
possible, I followed the link referenced in the article to
 find out exactly what plant or food materials were used for the dyes.

The link lead me to blogger Sonia Bauer.  It was there that I discovered
 that Sonia had used red cabbage, yellow onion skins, and cranberries to achieve
 the earthy colors shown on the eggs in the magazine. 

While I found Sonia's instructions helpful,
being the "exacting" person that I am, I needed more
precise measurements for the dyes.

I turned to Martha Stewart for advice, and, of course, 
Martha didn't let me down.  As a matter of fact, she gave me the idea
for substituting strong coffee for the cranberries.   ; )
 

There's never a shortage of plant material when you live on
the edge of national forest, so gathering natural elements for 
decorations for this project was a cinch.

Well...
except for the daisies.  Mine aren't blooming yet,
so I decided to try the faux variety.

Big mistake!

I counted on the faux daisies to be coated with a waterproof substance.
Turns out, it was more like a water-resistant substance...

AND 
definitely NOT a vinegar-based-dye-proof substance.


Everything I read stated that white eggs were the best for dyeing. 
Any other color alters the appearance of the dye.

That  made sense to me, so I went with it.


I followed the formulas on Martha Stewart's site for making the red cabbage
and coffee dyes.  As for the yellow onion skins, I only used the skins from two large
onions, and that worked fine for me.

I let the dye materials—red cabbage, yellow onion skins, coffeesimmer
in water  for the advised thirty minutes, but felt the dye was
too pale at the end of that time.

So, I continued to let everything simmer for an additional thirty minutes.

Once I was satisfied with the depth and richness of the dye
 color, I turned off the heat and removed as much of the cabbage and onion skins
from the pots as was possible with a slotted spoon.


Several sites suggested straining the homemade dyes, prior to coloring
 the eggs—to strain out particles and sediment.

I discovered the easiest way to do that was by placing a coffee filter
in a large strainer and gently stirring with a spoon.  For the coffee, it was necessary
to change the filter several times.


Placement of the plant materials on the eggs was trickier than
I had imagined it would be.

Stretching the stocking fabric around the egg—to keep the decoration in place—
caused the plant materials to bunch up as I stretched the stocking. 

Since I wanted to keep everything as natural as I could, I didn't want to use
any sort of glue to hold the plants in place.

Then I had the idea of using a bit of egg white diluted with water
as a means of temporarily adhering the plant to the egg.

That's where the small dish and brush came in.

And believe me, a little of that homemade glue goes a long way!


I also discovered that I could place the plant right-side up or down—
whichever was easiest...
and looked the best.


Once I had the plant or flower on the egg, I wrapped a piece of the
stocking material around and secured it with a small piece of twist tie.


Before cutting off the excess stocking material, I turned the egg over
to make sure I was happy with the plant placement.

The area of the egg where you pull the stocking together and tie it off will
leave a unique star design once the egg is dyed.

I thought that was an interesting side effect.


Though I used the Color Glossary on Martha Stewart's site as a reference
for the length of time to leave the eggs in the dye, I checked every five
minutes or so—after the first twenty minutes—to keep the
color from getting darker than I wanted.

As soon as I was satisfied with the color, I removed the eggs
with a slotted spoon and placed them on a paper towel-covered plate,
where I gently patted them dry.

Once they were cool enough to handle, I carefully removed the
stockings and plants from each egg.


I discovered that I liked best the designs created by the
plants with many multiple fronds, leaves or petals.


Those with a single broad surface area—like the miniature violets—
were not as pleasing in the end.


I found that using faux flowers was possible, but much more time-consuming.
The dye bled through the flower fabric and left only a faint outline

The image that you see here was the result of
painstakingly rubbing away the dye to reveal a clearer image.

To do that, I saturated a Q-tip in white vinegar, squeezed most of it out, and ever so
gently removed the dye until a distinct flower became apparent.

Obviously, using the real deal would have saved much time and grief.

Live and learn, right?!   ; )


Though this process is much more involved than the drop, dissolve, 
and dip method, the final product is quite rewarding.


Here are a few other tips I learned along
the way that should make your experience
less a matter of trial and error
than mine was:

The dyes you create are just that...dyes.  They stain anything they come in
contact with—hands, clothing, countertops, etc., so use caution.

To prevent eggs from cracking, make sure the eggs and the dye solution
you place them in are about the same temperature. 

You can boil the eggs in the prepared dye solution—which is what I did—
or boil eggs ahead of time and use the cold dip method
(details on Martha Stewart's site).

While faux flowers and plants can be used, they create more work in the end.
Next time, I'll use the real thing!

If you use the same slotted spoon to stir or remove the eggs,
rinse before introducing it into a different dye color.

The dye will rub off the eggs, if they're handled too much
before they've had time to cure.

Rather than purchasing new stockings, I used what was on hand. 
Though the color I used was neutral, it was still hard to tell
when the dye was the color I wanted. 

 I think white stockings might make it a tad easier
to tell when the eggs are dyed the color desired.

Being an organic gardner, I compost everything possible. 
So it was an easy task to simply save the coffee grounds from several pots of coffee
to reuse to make the brown dye.

Be sure to refrigerate the coffee grounds if it will take a while
to accumulate what you need.


I'm anxious to try my hand at making dyes from other materials and finding
interesting elements from nature to create new designs.

These sites offer ideas for other materials that can be 
used to create different dye colors:


Have fun and happy creating!   ; )


Linking to:

Tuesday, March 13, 2012

A total copycat? Not "eggs"actly.


When I received this issue of Country Living last spring, I knew I would be
using the gorgeous cover photo as inspiration
somehow the following year.

Everything about that image appealed to me—
the earthiness of the dyed eggs, the soft white elements,
the serenely sophisticated style.

a few months ago, I decided to pull this magazine
 back out and plan my strategy.

As I began collecting the various pieces needed to
re-create the Country Living vignette, I found I was lacking
two things—the proper dish to hold the eggs and
a bird figurine that I didn't mind painting.


A visit to one of my favorite flea markets proved to be quite productive.
I found this pretty ceramic piece and the cute little vintage,
 plastic birds for a mere buck each.

The colors were not what I wanted, but the styles were
  "eggs"actly what I had in mind.   ; )


With a tiny repair, to replace the missing beak of one of the birds, and a good coat
of my favorite white spray paint—KRYLON's Fusion in
 Dover White—both flea-market finds were ready to be put into service.


Next, I selected four silver-plated forks from my stash of mismatched goods
and four white English ironstone dessert plates.


I thought these vintage Boopie glasses—pieces inherited from
my grandmother—would make a nice addition.


The pretty cross-stitched linens were another fabulous deal
I found them at an estate sale a few years ago...
 for a grand total of twenty-five cents!


None of the walls in the cottage are blue, so I had to come up with something else
that I felt would be the perfect backdrop for my spring vignette.

And you know where I go when I need that "perfect something"!
Yep, you guessed it...the barn.

That's where this fantastic, old, chippy-paint door has been
stored—amid all the other wonderful architectural pieces
awaiting their day in the sun.


Once I had gathered the flowers and leaves from around the farm
and concocted the homemade dyes, it was time to get down to creating
 the part of this vignette that makes it so impressive. 

Of course, the beautiful, dyed eggs are really the showstopper here!


Since my tulips have not bloomed yet, I had to make a quick stop
at the local supermarket—meaning forty minutes away for me—
to find these lovely, white beauties.


I'm actually quite pleased with the end result of this copycat challenge.


And I learned a lot about making my own natural dyes...
as well as, the best ways to use the materials from nature
to embellish the eggs being dyed.


I also discovered a number of things NOT to do!


My eggs are certainly not perfect.

But for my very first attempt, I think they're terrific.


I wonder how many eggs the folks at Country Living
had to prepare to come up with the flawless masterpieces
that graced that magazine cover?   ; )


If you would like to know how to create pretty spring eggs like these, 
be sure to stop back by in a few days.  I would love to share some special tips that will make
your experience a little less "trial and error" than mine was.   ; )


Linking to:
Debbiedoo's Copycat Party


Tammy's Anything Goes
Kathleen's White Wednesday
The Style Sisters' Centerpiece Wednesdays
Patti and Paula's What's It Wednesday
Jill's Voila Party
Shannon and Dean's Diy Link Party
The Tablescaper's Seasonal Sundays

Monday, July 4, 2011

Happy Fourth of July!


"And I'm proud to be an American, where at least I know I'm free.


And I wont forget the men who died, who gave that right to me.


And I gladly stand up, next to you, and defend her still today.


‘Cause there ain't no doubt I love this land,
God bless the USA."
~Lee Greenwood~


Happy 4th!


Linking to Maryann's Domestically Speaking.

Sunday, July 4, 2010

Happy 4th!


Have a very happy and safe July 4th...
and be blessed!

~Liz~

Saturday, February 6, 2010

Fourteen Days of Love - Day 6 - Oh...You're so Crafty!


We all know there is no shortage of
 creativity out in the blogosphere.  So, there
should be quite a show of special crafts dedicated to LOVE
for this Valentine's party!


I come from a long line of crafty women—no,
not that kind—the good kind!!!   ; )

My grandmother was a seamstress, who passed that skill on to
her daughter—my mother—who passed it on to me.

 It's a craft that has proven to be quite useful for all of us,
especially during the years of rearing children and making our homes
our families' havens.


I have a daughter who now also has a daughter—my granddaughter, Lana.

My daughter, Asheley, set out to find a very 
unique Christmas stocking for her daughter's very first Christmas.

(I know you must be thinking I have my holidays mixed up, but I don't.
Since the current holiday is all about love, I thought I'd share a very special
craft project that I feel totally represents that topic.  So just
hang in there!)

Asheley looked for weeks for that special stocking,
but found nothing she felt was special enough.

So, Grammy—that would be me—put the old (but not that old!)
thinking cap on and came up with this solution.


I felt that if I could pull together everything I needed,
from bits and pieces gathered from the four generations who came before her,
I could craft a very unique Christmas stocking for my first grandchild.

Each of the items you see in the photo above represents something that
belonged to either my grandmother, my mother, my daughter, or me.


My grandmother had already moved on to heaven,
years before Lana was born.

And the only thing my mom could find that had belonged to Grandma—something
appropriate for this project, anyway—was a pink cotton nightgown,
stored away in her keepsake trunk, along with some vintage buttons.


My mom donated a variety of lace pieces
and several cards of tiny vintage buttons that were
just perfect for a baby's stocking.

From my collection of vintage fabrics
and notions, I was able to select a fabric for the stocking itself and several
battenburg lace doilies to use as embellishment.

Asheley has not yet taken up the craft of sewing. So, it was even more challenging
 to determine what her contribution to this project would be.


But, as she and I sorted through her keepsakes, I spied two items that
were exactly what was needed to finish off this one-of-a-kind gift.

There was a garter from Asheley's wedding—there had been two,
one to throw and one to keep—and a piece of sequined trim that
we had used on a costume we'd made for her senior prom.


The theme for her prom had been Phantom of the Opera and that pretty 
trim had been used on an elaborate mask we had
created to go with her gown and cape.

Now, with all the necessary elements assembled,
I was ready to embark on the journey to create that
 "special" Christmas stocking.


The pink cotton from Grandma's gown was used for the lining
and the inside ruffle at the top of the stocking. 

The outer ruffle, at the top, was created from a piece
of my mother's lace.

There could not have been a more appropriate trim—to unite
the ruffles at the top and the stocking fabric itself—than
 Asheley's bridal garter.

Look back at the image above.  See how the solitary
 rhinestone heart plays up the tiny hearts in the lace?
Hearts are synonymous with Valentine's, right?  And you thought
 I was confused about the holiday!   ; )


There was just enough of the sequined trim to
 create a heart in the center of the stocking
 and accent the toe and heel as well.

Isn't that pink heart button
from my grandmother's collection precious?!


One of my battenburg lace doilies was heart-shaped,
so it became the focal point at the center of the stocking.  It made a terrific
 background for the sequined heart and pink heart button.

The other doily was cut apart and used as
decoration on the toe and heel.


I selected several other vintage buttons—from the assortment 
gathered from my grandmother, my mother, and me—and used
those as the final decorative touches.

And the bits and pieces of
four generations culminated in this.


The three generations of mothers still living, 
who have seen this sweet little Christmas stocking in person,
are well pleased with the end product.

And I believe Grandma is smiling down from heaven,
 knowing that she was able to contribute something special
to one of her great-great-grandchildren.

But Grandma's most beautiful contribution 
was not the material things needed to create a Christmas stocking.  It was her link in the chain
of mothers' love that has been passed down through the generations!


Now on to the giveaway goodies:
Crafting is so much more that just assembling bits and pieces.  It's
 an expression of who we are.

So…
today, I'm adding an assortment of fabric, buttons and trim to
this week's giveaway—some vintage, some new. 

Hopefully, the winner will be able to create 
her own very special keepsake for a loved one.


And...
did I create a little suspense about yesterday's giveaway?
I certainly hope so!!!

I know you're just dying to know what it is.
So, without further delay...


here is the adorable set of mini bowls
that will be added to the giveaway, for yesterday's topic—Seeing Red.


Sharing at
Tiffany's Making the World Cuter Mondays, Kaysi's Motivate Me Monday,
Beverly's Pink Saturday.


Reminder:  Please be sure to publish your
Valentine's post, before you link to the party. And
don't forget to mention the Brambleberry Cottage
in your post.

Remember to leave a comment to be entered in this
week's drawing for the giveaway!

1. Patricias Heart Banner
2. Jenn Raley
3. http://sweetnothingsbj.blogspot.com/2010/02/hugs-and-kisses-to-you.html
4. http://beansiebabbles.blogspot.com/2010/02/day-six-of-fourteen.html
5. Ann Creek
6. http://donna-sugarspicesouthernlife.blogspot.com/
7. barbara jean
8. Marilyn