Diane @ Pittypat Paperie knew the party was still happenin' here, so she shared her tip for a festive recycle to celebrate. Great job, Diane!
And now it's my turn to share a few tips and tricks.
I received so many wonderful e-mails and kind comments about my yard conservatory that I decided to give you a quick tutorial for its construction.
The windows you choose for your conservatory will dictate the shape it takes.
I knew before I started the shape I wanted. Of course, having the advantage of a stash of vintage windows in my barn afforded me multiple options.
With the group of windows I selected, I could have built up, instead of out. But, I knew before I began that I wanted my yard conservatory to resemble a cottage.
Here are a couple of tips:
Cleaning everything prior to assembly is much easier than after construction is complete.
And, if you intend to leave your conservatory outside, it's best to brush on a weather-resistant sealant like Thompson's WaterSeal.
Because I wanted my piece to have a very stable construction, a few more steps were taken than were absolutely necessary. You'll have to decide if the extra effort is worth it to you.
After all components were cleaned, dried, and sealed, a four-pane window was sandwiched between two six-pane windows.
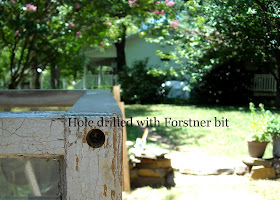
Rather than just nailing the three windows together, a 1/2" Forstner bit—on a cordless drill—was used to create holes for insetting screws.
Two holes were made—top and bottom—on each side. And 2 1/2" wood screws were used to join them all together.
If you take a close look at the image below, you'll observe that one of the four-pane windows was slightly taller than the other. I could have left it that way, but decided to make them the same size.
Again, it was purely a matter of preference. You might have chosen to leave them different heights—and that would have worked, as well.
It was a breeze to cut the taller sash down with a circular saw. To do so, just measure, use a carpenter's square to draw a straight line, and cut.
I also wanted the two windows for the top to rest flush on the sides. So the circular saw was set at a 45 degree angle, and the part of each window that would be placed atop the sides was cut down.
Notice how cutting that angle into the top windows helped to close the gaps between the top and sides.
Before the two top windows were fastened on, they were aligned.
This was accomplished by finding the exact midpoint on the front of the yard conservatory and clamping the carpenter's level so that the outer edge of it lined up perfectly with the midpoint.
Then the top windows were adjusted so that they touched exactly above the midpoint. Now it was time to screw them in place.
Here's another tip:
To prevent wood that you will be screwing into from splitting, always start a pilot hole with a drill and bit, first. The bit should create a hole slightly smaller than the one that will be made by the screw.
Because I wanted a more finished look, and would be attaching a sheet of antique metal and a decorative piece of iron to the peak of the roof, a piece of wood was cut and screwed in at the center seam.
Not only did it help to stablize the top, it gave much needed support to the embellishments.
Finally, the four-pane window—the one trimmed down—was hinged to the front of the piece.
Several pieces of vintage beaded-board were ripped on the table saw, then cut to trim out all the exposed edges of the yard conservatory.
You can choose to leave yours open at the bottom, so that it will rest directly on the ground, or enclose it, and put it on legs—as I did.
Want to see how I embellished mine? Then jump over here.
As far as decorative elements are concerned, the sky's the limit. The important thing is to have fun and make it uniquely yours!
I'm linking to Rory's Tools are for Women Too!


How charming and unique!! All those ramshackle components, weathered by Time, put together with such precision and care---what a treasure.
ReplyDeleteLiz you rock. I am in awe at the awesome stuff you can do and how comfortable you are with power tools. I am sorry I forgot to add your link from joining your party. I went back and did it. Will try to remember in the future.
ReplyDeleteThat of course is beautiful and thanks for sharing. And of course tools are for women too- if anyone knows you and what you do then that is obvious.
ReplyDeleteHope to see you in Cameron...
tammy
That is adorable! I love your tuts, I learn more about tools every time. Thanks.
ReplyDelete